Today I went to the movies with my sister June and saw Arthur Christmas. We had a grand time. Tonight I followed Mario on twitter #12Tags and Mario Rossi facebook for BTS or Behind The Scenes for Tim's 12 Tags on my android phone, while watching Zombieland with my husband then Revenge with Valerie. I even saw my son Allen for a few minutes. It's been a pretty eventful day.
I'm getting ready for Tim's 12 Tags which will premier at 12 midnight Mountain time. Mario's BTS has already shown Tim's Pine Cone die and Martha Stewart Glitter. I'll be fast asleep by the time Tim posts to his blog since I'm on the east coast. But I'll be up early in the morning to see that gorgeous tag and I think there is going to be a video. Then I'll be off to Archiver's to meet with some friends and we'll have a Tim day making tags. I'm excited to say the least.
One last thought and shout out to NaBloPoMo. This final day in November marks a milestone for me. I have posted every day this month and I have enjoyed it. It wasn't that hard. NaBloPoMo sent me a email inviting me to join them next month and post every day in December but I think I'll keep it an annual thing. But I will post more than I have been before this challenge started. I enjoy creating things and posting them. I found some challenges I really enjoy participating in. I have some followers now and even tell my friends now that I have a blog. I am starting to make new friends online. I've added some features to my blog such as labels with a word cloud and finally figured out how to get a decent shot with my camera without having to go outside. This is a good thing because with Winter coming it's going to get cold. Yes even here in Georgia it gets cold in the winter and occasionally we even have snow.
So if you're following my blog I want to say thanks. If you visit from time to time I still want to say thanks AND if you leave a comment Thank you very much!
Wednesday, November 30, 2011
Tuesday, November 29, 2011
Stars and Stamps Sketch Challenge # 97

 |
| Notice the white panel? |
 |
| Stars and Stamps Sketch Challenge # 97 |
Monday, November 28, 2011
Sending Love
| Ranger's Seafoam White Embossing Powder and Hero Arts CG145 Reversed Flowers and Leaves |
|
| Stars and Stamps Sketch Challenge # 97 |
|
| More to do! |
Sunday, November 27, 2011
Clean and Simple
 |
| Clean and Simple |
I had to pull out my 2006 Hero Arts Catalog to find the info on this stamp set. I had them displayed on a shelf on my wall and didn't realize the blocks were not marked, just the box which I no longer have. They are LL 989 Heart Messages - Stencil Print (reg). The acetate is Mod Circles HO636 from Hambly Studios.
I think it qualifies for Clean and Simple, but I'm not sure. What do you think?
Saturday, November 26, 2011
I Love Grungy Monday 28
 | |
| Alcohol Inks and Embossed Foil |
You may recognize my butterfly from earlier in the week when I created it and posted it on my blog. I made my butterfly by covering one of Tim's grungeboard butterflies with the foil and running it through my Big Shot with the Regal Flourishes embossing folder. Then I dripped on alcohol inks letting them dry between colors and although you can't see it here direct to foil Archival jet black ink on the raised areas. It really accents the alcohol inks. The body of the butterfly is a stick pen from Making Memories also covered in alcohol ink and the wings are connected with wire and tiny attacher staples. One thing you couldn't see before are the butterfly's antennae. They are light weight wire that is wrapped tightly around the wire ring at the top of the stick pin with the ends sticking out on each end to form the antennae. The light blue flower behind them helps to show them off.
Today I finished my project by covering the frame with the Inkssentials adhesive foil and embossing it with the Damask embossing folder from the same set. I already had this Chipboard Frame from a Making Memories kit. I used the alcohol inks and Archival Jet Black Ink per Tim's instructions.
The flowers are Grungeboard die cut from Tim's Tattered Floral Die. I used Rock Candy Distress Stickles and Distress Stains with a technique I learned from Tim when he was guest instructor in Jennifer McGuire's Inspiration Showcase class. The stickpin butterfly is pushed through the foam dots used to layer the flower with the big pearl.
The picture in the frame is one of my favorites of a trip I took with my daughter Valerie to the Chattanooga Aquarium in 2007. They have a wonderful Aquarium and a beautiful Butterfly Garden. I will always think of their Butterfly Garden when I think of Chattanooga.
Thanks for stopping by and taking a look. Be sure to leave a comment if you have time. Now I'm going to go and check out the other entries posted on Linda's blog. So far there are 23, but the challenge is open until tomorrow, Sunday November 27th at 8pm MDT. I really enjoy Linda's Grungy Mondays Challenge.
Friday, November 25, 2011
Circle Heart
 |
| Following a Kristina Werner Design Sketch |
Kristina had 3 really cute card sketches for the class that I really liked so I decided to check out her blog. Kristina had just started her Holiday Card Series 2011 on November 8th. For 25 days she posted a new card and a video showing her creating the card, using a variety of supplies. I loved the cards and I loved the videos. I have been hooked ever since.
The card I've posted today is following one of her Holiday Card Series 2011 designs. Kristina's card used Basic Grey Nordic Holiday. Following her design, I was easily able to use Basic Grey Sweet Threads to create a "Love" Card to send off with my box of cards for Operation Write Home.
I enjoyed Kristina's cards so much I decided to purchase the Virtual Card Class for Holiday Card Series 2011. For a mere $5 I was able to purchase a pdf file complete with beautiful pictures of all the cards, a supply list and direct links to each card post and videos. Now it is quick and easy to find any card in the series when I need a quick idea. Just like I did today. Kristina's card is gorgeous. If you want to take a look check it out here.
Thanks for stopping by.
Ruby
Thursday, November 24, 2011
Happy Thanksgiving!

Notice that the burlap background, painting on fabric and sewing techniques used here. All trendy in scrapbooking today. Except this is a project my daughter Valerie did in 1989 when she was 5 years old. I'm sure kindergarteners around the country are still painting their little hands and fingers to make Happy Turkeys for Thanksgiving.
I hope you all have had a Very Happy Thanksgiving!
Wednesday, November 23, 2011
Archway Cookies
 |
| "Love is All Around" |
Distress inks are Worn Lipstick and Barn Door. The lighter cardstock is cream. Stamp set is " Love is All Around" from Impressive Obsessions. If you want to know why I am making Love cards then you need to check out why Archway Cookies is sending cookies to our troops. (See the link above) This is card is also going in my box to send to Operation Write Home. I think I may make multiples of this one. It is based loosely on this weeks sketch.
Tuesday, November 22, 2011
Tim's Pumpkin, My Butterfly

What you see here is a butterfly I made from one of his grungeboard butterflies covered with the foil and running it through my Big Shot with the Regal Flourishes embossing folder. Then I dripped on alcohol inks letting them dry between colors and although you can't see it here direct to foil Archival jet black ink on the raised areas. It really accents the alcohol inks. The body of the butterfly is a stick pen from Making Memories also covered in alcohol ink and everything is connected with wire and tiny attacher staples. I'm thinking about entering it in the Grungy Monday challenge this week at Studio L3 because this is the Tim Holtz technique she is challenging us to try. She has a fantastic prize this week so I want to work on this a little more before I enter it and get a better picture too. Wish me luck! You know you still have time to work on a project if you want to enter one. In case you do I'll wish you luck!
Monday, November 21, 2011
Stars and Stamps Challenge 96
 |
| Sending Happy Thoughts |
This beautiful stamp is from Anna Griffin's 2005 Rose Collection 580156 by All Night Media. I love the fine delicate lines and found it perfect for water colors pencils and a aqua brush. I sometimes will stamp images and take them with me to crops when I don't have a particular project I'm working on. That way I can still join my friends and have something to work on. When I saw the sketch this week I pulled out my image and picked some papers to go with it and did a little cut, paste and layering. The "sending happy thoughts" is a Hero Arts cling stamp that came in a special little set that I had received at a special crop at Archiver's a few years ago. I just carefully cut the lines of sentiment on the stamp apart so I could space them out in a line and stamp them. I used VersaMark and Zing White embossing powder, then tore the paper to make the little strips. The pattern paper is Sweet Threads from Basic Grey. I've used a little Broken China Distress inks to blend the edges of the card and tone down the bright green of the base card.

I'm pleased with how my card turned out and it will go in my collection to send to Operation Write Home. They will send my cards along with many others to our troops serving far away from home so our troops will have handmade cards to use when writing home to their friends and family. If you want to know more check out their website at: http://operationwritehome.org/
Sunday, November 20, 2011
Stars and Stamps Weekly Sketch Challenge
The link for Operation Write Home is here.
Saturday, November 19, 2011
Perfect Pearl Mini Misters - Grungy Monday 27
You can also see how Tim Holtz makes the Perfect Pearl Distress Ink mist here along with his 2008 March technique challenge tag.
My mist combinations are:
Walnut Stain and Perfect Cooper
Broken China and Perfect Pearl
Shabby Shutters and Perfect Gold
I wish you could see the shimmer but it is hard to capture on camera. You'll either have to take my word for it or mix up your own batch and try it for yourself.
Thanks for stopping by.
Friday, November 18, 2011
Think Pink

| I wanted to make a card for a friend who just had surgery for breast cancer. She is just beginning her treatment and I wanted to let her know I was thinking of her. I wanted to make her something pink and I wanted to use my Anna Griffin paper. This is a paper I fell in love with when I first started to scrapbook. It is a beautiful paper line, full of elegant floral motifs. It is peaceful and serene. I wanted to share that with my friend. She is a very brave and courageous woman. She is strong and beautiful. I know she will beat this. | ||
Thursday, November 17, 2011
Water Color Finger Paints
 |
| Water color finger paints with Distress Inks and Perfect Pearls ~ Still Shimmery once they dry! |
Check out the video here.
Ranger makes the Perfect Pearl mist already mixed up but I already had some Perfect Pearl on hand, so I mixed up my own Perfect Pearl mist and played around with it a little bit. I stamped my Hero Arts Big Owl stamp with VersaMark on water color paper and heat embossed with Gold Sand Embossing Powder. The cards are already dry here, but I spritzed a little Distress Ink on my craft mat until it beaded up so you could really see the shimmer.What a fun way to get inky fingers.
Wednesday, November 16, 2011
Golden Sand
 |
| Big Owl Embossed with Golden Sand Embossing Powder |
The embossing powder is by Stampendous and is called Golden Sand. It is a creamy color with brown and gold flecks. I had been wanting to try it with this stamp and maybe do a snowy owl, but once I started playing with the distress inks I just had too add more colors! I've used Vintage Photo, Faded Jean, Chipped Sapphire, Shabby Shutters and Worn Lipstick. Big Owl did look a little strange with his white eyes so I took a brown Slick Writer and colored in the pupils and the feet.
I had finished my owl and was going through my paper stash looking for paper I could use to make my card when I ran across an old favorite from SEI called Mini Memories. When I first started scrapbooking I made a small album using this paper line. I loved the colors and the geometric patterns. So many different variations. A collector's dream. I had a small bag with several sheets of paper and the alphabet stickers left.
After a little playing around with different combinations of paper and layout options, I settled on this one. To help the letters stand out, I outlined the stickers with a dotted line using a brown Zig Millennium marker. These are great fiber tip pens and made adding the dotted line simple and quick.
There are so many beautiful paper lines out now all with wonderful embellishments to make coordinating elements so easy. I really love being able to mix up things I already have on hand and having it come out so well. One more card for Operation Write Home!
Tuesday, November 15, 2011
HOO-RAY
Who Loves You!

In celebration I have made a card with my favorite Hero Arts Owl to send with my Operation Write Home Cards!"The random winner from all of the cards created for Operation Write Home and submitted to our Flickr Group is RubyLou! RubyLou, you’ll be receiving the new Hero Arts-Operation Write Home stamps just as soon as they’re released."
I decide to add a little speech balloon at the top. Who (heart) You? is stamped with Hero Arts fanciful swirl alphabet CL141
Monday, November 14, 2011
Brightly Blinged

Sunday, November 13, 2011
Share Laughter
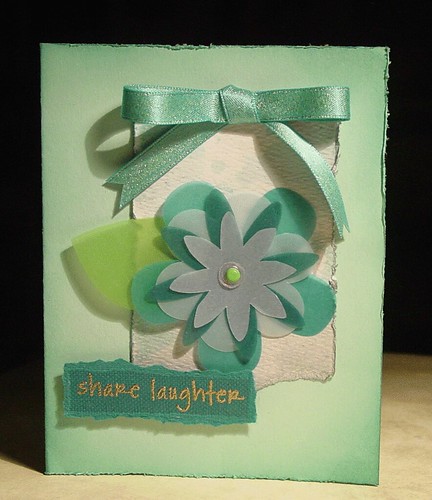
This card is for a Sketch Challenge 95 at Stars and Stamps. They are the blog for Operation Write Home. The sketch was designed by Peggy.
I used Iced Spruce and Evergreen Bough Distress Inks, smashing the ink pad side by side on a craft sheet, and misting with water until the ink beads up and swiping white water color paper through the ink. You can let it dry or heat set, then swipe some more until you get the effect you want.
 |
| Peggy's Sketch |
The vellum flowers are pre-cut from Fiskars. Share Laughter is Gold Embossed. The stamp is from a Hero Arts set of the same name, CL151. The ribbon has little specks of gold woven in.
Saturday, November 12, 2011
One more for the Hop

The other thing that kept me busy this weekend was the "Operation Write Home" Blog Hop. There were 11 companies who participated in the Hop. They asked their artist to design cards to show their support for the troops. You would think only 11 blogs would not take that long to visit, but there were multiple cards at each site. SRM had 21 beautiful cards, Copic had a technique I've never seen before and Ranger had cards by 8 different artist and one of them was my hero, Tim Holtz. Some of these blogs I had never been to before but all of them had something that wowed me.
This is a card I made to send to Operation Write Home. I designed it as a tri-fold card. I used Hero Arts "Dot Flourish" CL285 stamp set. I stamped the front of the card and the first inside flap and white embossed them. Then used Worn Lipstick Distress Ink to stamp a border on the inside but left it mostly white to allow more room to write home. The pattern paper is Basic Grey "Perhaps" for base and Bittersweet" for Heart, which is die cut with "Heart Wings" Tim Holtz Alterations from Sizzix. Border punch from Martha Stewart.
These are the fine companies who participated this weekend to inspire us to create cards for the troops and make us aware of Operation Write Home.
- Hero Arts
- Sizzix
- Tombow
- Prima
- Ranger
- Studio Calico
- Tonic Studios
- Basic Grey
- Copic Marker
- SRM Stickers
- May Arts

Friday, November 11, 2011
Operation Write Home Blog Hop

I've created this card to send in to Operation Write Home. I'll be making some more too. It's too late to donate Christmas cards for this season, but they are asking for Valentine Day Cards, Thinking of You or Missing You themes.
Since we can't use glitter on cards for the troops I used Gold embossing powder and applied it to the distressed inked edges of the hearts and lower edge of card to give it a little shine and texture. I also used Picket Fence Distress stain to tone down colors in background pattern paper and card stock so the hearts would stand out more. The pattern paper is Basic Grey Bittersweet. The gold embossed hearts were stamped along the bottom with HeroArts stamp F 3798 "Wavy Hearts". The the large solid hearts in the center are from the Tim Holtz Alterations Sizzix Die Cut "Heart Wings". The scallop circle are a Quickutz die, I believe it is called "stacking flowers". I also used the Fiskars Treading water border punch and pleated the paper. I used Antique Linen Distress Ink to distress the edges.
Thursday, November 10, 2011
Not so Quick Card

The clear ornament on top of the red one is a round Fragment that I sanded to get a frosty look and then used clear embossing powder to emboss the snowflakes on it. I drilled a small hole near the top and trimmed off the grungboard bow and tied a ribbon bow.
Then I glue dotted the ribbon to the red ornament allowing the frosted fragment to swing freely.
 |
| close up of sanded fragment with clear embossing |
I stamped the pine bough from Santa's Wish CMS 032 from Stampers Annymous Tim Holtz collection in Evergreen Bough Seasonal Distress Ink repeatedly on white cardstock.. The Merry Christmas is silver embossed from Hero Arts AR147 Merry Christmas which is a Clearly Archiver's by Hero Arts set from a few years back. After rounding the corners I added it to the front of a card I had covered with some Christmas paper from my stash.
Wednesday, November 9, 2011
12 Tags of Christmas
If I haven't mentioned it before, Tim Holtz is my Hero! I love his style and his products are the best! He
has an excellent blog and updates it frequently. I never know what I
might find. He may post about a new product along with excellent
projects with all the details on how he made it . He may feature one of
his latest adventures, a class he's teaching or just to wish us a Happy
Holiday, whatever the current one is! He is always warm and friendly. He reads all of his comments
even though he can't answer them all. He loves to hear from us so to encourage us to leave a comment, from time to time, he will have an excellent give a way. Just for leaving a comment! (Some of us are very shy) I enjoy visiting his blog. It is my favorite.
Since 2007 Tim Holtz has been posting the 12 Tags of Christmas. Every morning from December 1st to December 12th I wake up earlier than I thought possible and stumble to the computer. It's just like when I was a little girl and knew that Santa had come and just had to see what he left for me! Then it was by the glow of the Christmas tree lights that I discovered amazing treasures. Now it's by the glow of the computer screen, since I usually am not awake enough to find the light switch. I ooooh and aaaaah as I look at his amazing creations, slowly scrolling through all the pictures and then go back an read the instructions to see how he does his magic. I always have to leave a comment too! That's because every night Tim is busy creating a tag, but Mario makes sure all the people who left a comment are added to the randomizer for a chance to win a prize. It's like making it onto the "Nice" list.
The card you see here is inspired by the tag Tim made for Day 3 of 2007 12 Tags of Christmas. He used an amazing technique with different colors of Distress Embossing Powder. You can see the original post with his tag and all the details here. I won the drawing from the names of people who made comments that day. Tim and Mario sent me the "Santa's Wish" stamp set along with a few other items. I used them and the Distress Embossing Powder technique to make my Christmas card that year. That year Tim also signed the tag he created that day and included it in my prize box. I was so excited. I still am.
I hope Tim does 12 Tags again this year. It is too much fun for me!
Since 2007 Tim Holtz has been posting the 12 Tags of Christmas. Every morning from December 1st to December 12th I wake up earlier than I thought possible and stumble to the computer. It's just like when I was a little girl and knew that Santa had come and just had to see what he left for me! Then it was by the glow of the Christmas tree lights that I discovered amazing treasures. Now it's by the glow of the computer screen, since I usually am not awake enough to find the light switch. I ooooh and aaaaah as I look at his amazing creations, slowly scrolling through all the pictures and then go back an read the instructions to see how he does his magic. I always have to leave a comment too! That's because every night Tim is busy creating a tag, but Mario makes sure all the people who left a comment are added to the randomizer for a chance to win a prize. It's like making it onto the "Nice" list.
 |
| All colors are from Distress Embossing Powder - 2007 |
The card you see here is inspired by the tag Tim made for Day 3 of 2007 12 Tags of Christmas. He used an amazing technique with different colors of Distress Embossing Powder. You can see the original post with his tag and all the details here. I won the drawing from the names of people who made comments that day. Tim and Mario sent me the "Santa's Wish" stamp set along with a few other items. I used them and the Distress Embossing Powder technique to make my Christmas card that year. That year Tim also signed the tag he created that day and included it in my prize box. I was so excited. I still am.
I hope Tim does 12 Tags again this year. It is too much fun for me!
Tuesday, November 8, 2011
A Challenge! Too Much Fun! Grungy Monday 26
 |
| Santa's Wishing You A Merry Christmas |
Yes! I have completed my Tag for Studio L3 Grungy Monday 26 challenge for this week. I was very excited when I saw Linda had selected one of Tim Holtz's 12 Tags of Christmas for the challenge. We didn't have to make a Christmas Tag. Just create a project using the techniques of that post. But I love Christmas so I pulled out my Christmas stamps and got started. Here is my tag.
The materials used for this Tag were: Tim Holtz Idea-ology clear mask; Picket Fence Paint Dabber; Peeled Paint, Antique Linen, Iced Spruce, Evergreen Bough, Festive Berries Distress Inks; Archival Jet Black Ink; Gold Embossing Powder; Peeled Paint Distress Stickles; Candy Cane Stickles; a little strip of German Paper and miscellaneous ribbon. My "Santa" and "Merry Christmas" stamps are from the "Santa's Wish CMS 032" set and the "Long Tall Pine Trees" behind Santa's head are from the "Reindeer Flight CMS 052" stamp set. Both from Stamper's Anonymous Tim Holtz Collection.
If you want to check out the inspiration for my tag check out Tim's tag from Day 7 of The Twelve Tags of Christmas 2009 click here. Tim explains all the techniques and has pictures detailing each step. I cut more pieces for my mask since the stamp I used has more details and used different colors (The Winter Seasonal Inks are new) but otherwise I pretty much just followed his instructions for the techniques.
You still have time to create a project for Grungy Monday. To get the details go to Linda's blog by clicking here. While you're there check out her wonderful tag and all the other projects that the other talented artist are posting. The challenge ends this Sunday, November 13, 80pm MDT.
One last thing. I was visiting Tim's blog today and He was really excited to share a link to Tammy Tutterow's blog. So of course I had to check it out. Tammy has Tuesday Tutorials and shared a really cool technique using Rock Candy Distress Crackle Paint and Dry Embossing. I took a look and I think it Rocks! She calls it Frosty De-boss. Check it out here.
Monday, November 7, 2011
Grundy Monday 25
 |
| Roy and Betty Albea |
 |
| detail of film strip ribbon |
 |
| Once the crackle dries use distress inks |
I love Tim Holtz's products. I also love to watch him demo them. To see Tim's Videos on Crackle Paint, Distress Inks and more click here. To visit his blog click here.
I hope you visit Linda's Grungy Monday 25 Challenge and see some of the wonderful tributes the other ladies did. They are beautiful. While you're there, check out her current challenge. This week, Grungy Monday 26, the challenge is to used techniques from a tag Linda selected from one of Tim's 12 Tags of Christmas. I love Tim's 12 Tags and would love to tell you all about it but I'm saving that for another post. I've got to get busy. I'm not going to miss this week's challenge. It is going to be too much fun!
Sunday, November 6, 2011
Color Change

This is a twist on another card I posted earlier for the Hero Arts Bling-It challenge. If you want to see the first card it is here. I originally designed this card with silver and gold embossing powder on silver and gold paper. I loved the way it turned out but wondered what it would look like in Red and Green. I did end up making a few changes. I didn't use the holly and berry stamp for the side borders. Instead I used some pattern paper. I did use the same Christmas tree. This time I stamped it with shabby shutters distress ink and colored over it with Berol Prisma color pencils. I like the way I can blend the colors easily. I used Red Green and White gem stones in various sizes.I used the same Fiskars punches for the edge of the card front. I love these punches.. This card will go in with the ones I send for the Cards that Care drive. All cards need to be sent by November 31st.
Saturday, November 5, 2011

Friday, November 4, 2011
Cards that Care

If you've never been on a blog hop before, it starts with a post that tells you about the hop and gives you a link to the next stop. Sometimes you are visiting someone's blog and find out the are a participant in a blog hop. You become intrigued and want to follow the hop from the start, so they also have a link to where you can start from the beginning. Be sure to leave a comment to let them know you stopped by. Sometimes they have a drawing from all the comments for a prize. One way to explain a blog hop is that it's like a blog tour. Sort of like a tour of homes that is so popular during the Holidays. Usually you're seeing blogs you have never seen before (at least one or two) and many times they are supporting a good cause.
The Cards that Care hop has many blog stops and each will be posting a handmade Christmas card. It's a good way to see a wide variety of cards and techniques. I am looking forward to spending my spare time this weekend visiting the many sites, working on Christmas Cards for the drive and working. Yes, I am working every day this weekend, but I don't want to miss this. If you want to go on the blog hop start here.
Thursday, November 3, 2011
Hero Arts
 |
| Silver and Gold |
They also have bi-monthly contests. There are 3 categories you can enter each month. Just create a card using at least one Hero Arts stamp and upload it to Flicker. Add it to the Hero Arts group with the designated tag for that contest. It's that simple.
The categories for November are: (1) Holiday Tags and Gift Wrap, (2) Bling It Up! and (3) Color Challenge - Pink, Pool, Green, Neutral and White. Entries are due November 10th for the first round and November 27 for the second round.
When I saw the Bling It Up! category I started thinking about my favorite Christmas show when I was growing up. "Rudolph the Red Nosed Reindeer". The forest animals decorate the trees with silver and gold and those decorations "bling" as the snowman sings "Silver and Gold". I still love listening to Burl Ives sing "Silver and Gold".
It sounds like a fun category and I'm sure there will be plenty of entries. I tried my hand at it and this is what I came up with. Silver and Gold with lots of bling. I've used silver and gold embossing powder on silver and gold shimmer paper and of course added 2 different size gem stones for the holly berries and Christmas decorations on the tree, with a larger gemstone for the star on top. I also used a gold leaf pen to fill in the open leaves on the tree. All the stamps are Hero Arts cling stamps from seasons past . Very Blingy!
Wednesday, November 2, 2011
GUESS WHAT?!
Yes! Have you checked out Tim Holtz's blog today? Great announcement and video and of course a chance to win the newest seasonal color set. Seasonal Distress Ink Winter 2011. I don't want to give away all the details so click here, watch and learn and then leave a comment on Tim's Blog for a chance to win! But don't wait too long. Winners will be announced Friday 11/4.
Tuesday, November 1, 2011
Blogging Writes
I enjoyed the technique from Linda's Grungy Monday 24 Challenge last week but was a little impatient allowing enough time to make sure every thing was completely dry before stamping and adding the Perfect Pearls. If the background is not completely dry the Perfect Pearls will stick to the background too. See Tim's video here. Another problem I ran into was exactly how much to mist with water to get the ink under the pearls to wick but not misting so much that the pearls started to float on the water loosing the definition of the stamped image. So my picture today is of some additional backgrounds I inked for making additional tags. These backgrounds are a little darker so I may add a Snowman instead of a Reindeer.
Linda's Grungy Monday 25 is challenge this week is "Use your favorite Tim Holtz products to create a loving tribute to a friend, relative or inspiring person who's passed away." That would be my Mom and Dad. Linda's challenges are all based on the Tim Holtz techniques. I love checking out what everyone does. It's sorta like an unofficial blog hop. Only 2 post so far.
I also wanted to share that Tim Holtz is releasing the new Distress Inks Seasonal Series Winter 2011. These colors are so wintery it makes me start looking for snow.
I've added a new blinkie to my side bar for NaBloPoMo. BlogHer is a new blog I've found. Yes, It is about blogging. They are have designated November as National Blog Post Month .The idea is to blog every day this month. They will also have a new suggestion each day if you need ideas on what to blog about. Since I have decided to try to post more often, I thought this would be a good challenge for me so this is day one and I am posting. The thing is I usually blog about my art projects. I'm not saying I will create something new every day but I do think I will be spending more time creating in my studio which I wanted to do anyway. of course Jennifer Mcguire is having the Cards that Care card drive. So.... a new blog post every day. Quite a challenge. So good luck to me.
Subscribe to:
Posts (Atom)